m (→Pallet Town) |
m (→Pallet Town) |
||
| Line 50: | Line 50: | ||
Bulbasaur= |
Bulbasaur= |
||
{| class="wikitable" style="width:300px; margin:auto; text-align:center;" |
{| class="wikitable" style="width:300px; margin:auto; text-align:center;" |
||
| ⚫ | |||
|- |
|- |
||
| − | + | | [[Image:RB 004 front.png|link=Charmander]] |
|
| − | | colspan="2" rowspan="3" | [[Image:RB 004 front.png|link=Charmander]] |
||
|- |
|- |
||
| − | ! Your Rival |
||
! [[Charmander]]<br />Level. 5 |
! [[Charmander]]<br />Level. 5 |
||
|- |
|- |
||
| − | | [[File:Poke-dollar.gif|link=]] 175 |
||
| {{Type|Fire}} |
| {{Type|Fire}} |
||
|- |
|- |
||
| − | | |
||
| Scratch |
| Scratch |
||
|- |
|- |
||
| − | | |
||
| Growl |
| Growl |
||
|- |
|- |
||
| − | | |
||
| — |
| — |
||
|- |
|- |
||
| − | | |
||
| — |
| — |
||
|- |
|- |
||
| Line 76: | Line 70: | ||
Charmander= |
Charmander= |
||
{| class="wikitable" style="width:300px; margin:auto; text-align:center;" |
{| class="wikitable" style="width:300px; margin:auto; text-align:center;" |
||
| + | ! rowspan="14" | [[Image:Blue1(RB)Sprite.png|link=Blue (game)]]<br />Your Rival<br />[[File:Poke-dollar.gif|link=]] 175 |
||
|- |
|- |
||
| ⚫ | |||
| [[Image:RB 007 front.png|link=Charmander]] |
| [[Image:RB 007 front.png|link=Charmander]] |
||
|- |
|- |
||
| − | ! Your Rival |
||
! [[Squirtle]]<br />Level. 5 |
! [[Squirtle]]<br />Level. 5 |
||
|- |
|- |
||
| − | | [[File:Poke-dollar.gif|link=]] 175 |
||
| {{Type|Water}} |
| {{Type|Water}} |
||
|- |
|- |
||
| − | | |
||
| Tackle |
| Tackle |
||
|- |
|- |
||
| − | | |
||
| Tail Whip |
| Tail Whip |
||
|- |
|- |
||
| − | | |
||
| — |
| — |
||
|- |
|- |
||
| − | | |
||
| — |
| — |
||
|- |
|- |
||
| Line 102: | Line 90: | ||
Squirtle= |
Squirtle= |
||
{| class="wikitable" style="width:300px; margin:auto; text-align:center;" |
{| class="wikitable" style="width:300px; margin:auto; text-align:center;" |
||
| + | ! rowspan="14" | [[Image:Blue1(RB)Sprite.png|link=Blue (game)]]<br />Your Rival<br />[[File:Poke-dollar.gif|link=]] 175 |
||
|- |
|- |
||
| − | + | | [[Image:RB 001 front.png|link=Bulbasaur]] |
|
| − | | [[Image:RB 001 front.png|link=Charmander]] |
||
|- |
|- |
||
| − | ! Your Rival |
||
! [[Bulbasaur]]<br />Level. 5 |
! [[Bulbasaur]]<br />Level. 5 |
||
|- |
|- |
||
| − | | [[File:Poke-dollar.gif|link=]] 175 |
||
| {{Type|Grass}}/{{Type|Poison}} |
| {{Type|Grass}}/{{Type|Poison}} |
||
|- |
|- |
||
| − | | |
||
| Tackle |
| Tackle |
||
|- |
|- |
||
| − | | |
||
| Growl |
| Growl |
||
|- |
|- |
||
| − | | |
||
| — |
| — |
||
|- |
|- |
||
| − | | |
||
| — |
| — |
||
|- |
|- |
||
Revision as of 11:44, 6 September 2012
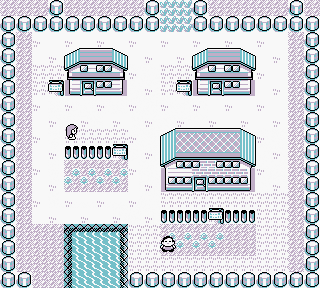
Pallet Town

Pallet Town.
After the introduction, you will start in Pallet Town in your home. Pallet Town counts only 3 houses. On the right side: Your Rival's house and Professor Oak's lab and on the left side: Your home. Pallet Town counts 10 peoples in total including you and your rival.
- The D-Pad will move the character around the game. They are very useful and most needed in the game. In can also move your cursor around in the menus.
- The A button is more to do things such as: talking to peoples in different town's, caves or routes or grabbing an item or selecting a item in your menu.
- The B button is more of canceling a subject. You can talk with B when you hit it with the A button to start the conversation but afterwards it cancels you to talk with the person when the conversation is finished.
- The Start button opens the game menu which the sections of:
- PokéDex — It is a major device in each Pokémon games. It can registered the Pokémon that you've seen or caught in battles. Unfortunately, if you've seen a Pokémon, the data about the whole Pokémon isn't known, only his image appearance and where is mostly seen.
- Pokémon — Is a section where you can see your Pokémons that you have captures. You can check their stats and attack etc.
- Item — Is a section where you can see which Items you've bought, found or has been given to you. Also you can see which TM's and HM's you've got obtained which can be given to your Pokémons.
- (Your name) — It is a trainer pass + It shows how many badges you have and how much you must gonna get.
- Save — It saves your game where you are currently. If you don't save the game and you are going over your limit to charge the battery or replace them in your game system, the data will be lost and will take you back to the last time that you've saved in the game.
- Option — It can choose you on various options in the game, such as "Speed Text", "Battle Animation" and "Battle Style".
- Exit — It will make you close the menu.
If you go outside to Professor Oak's lab, you will see your rival telling that Professor Oak isn't here. When you are talking with people around town they will tell things that are needed to know if you're just a starter. When you start walking to Route 1 (north of Pallet Town), then Professor Oak suddenly comes to you telling that it is dangerous to walk on those grass because wild Pokémons are living there and that you must need one for your own protection. Professor Oak then takes you to his lab which makes you choose first for your own Pokémon to begin with, do remember that you cannot choose wisely because your Rival will pick up a Pokémon much stronger then you:
| File:RB 004 front.png | 
|

|
|---|---|---|
| Charmander Level. 5 |
Squirtle Level. 5 |
Bulbasaur Level. 5 |
| Fire | Water | Grass/Poison |
You can choose three starter Pokémons which has been on the upper part of this text. The three starter Pokemons contains:
- Bulbasaur a grass and poison type Pokémon. If you pick up this Pokémon then you have no worries on your traveling which is known that he can defeat the first two gym leaders that contains Rock and Water Pokémons. It only get some troubles at the later part of your travels, but if you captured and trained some Pokémons then it will be no problem.
- Charmander is the worst possible Pokémon you can choose. It will have major troubles by the second badge which maybe you can succeed the first badge with luck. Anyways only on the later part the Pokémon becomes useful in Gym battles which can defeat the Celadon Gym leader Erika with ease.
- Squirtle also a better pick. This Pokémon can already defeat the first gym leader and can surpass the second with ease if you train him well. Trouble is that he might get some issues with the Vermilion Gym leader Lt. Surge by his use of electric type Pokémons, also the same for the Celadon Gym leader Erika who uses grass type Pokémons.
First battle with your rival.
After you've picked up your own Pokémon and you're about to leave, you're rival want to challenge you with his starter Pokémon. It will become your first Pokémon battle in the Pokémon game. A Pokémon Battle is also done through sections, which contains these:
- Fight — If you choose this section then you will see four moves, depends on how many moves your Pokémons have learned. Maximum a Pokémon can only choose up to 4 moves, if he learns a new one, then you may ask if there must be a move a Pokémon have learned to be gone to make room for the new one.
- Pokémon — This section can bring you to your Pokémons that you've caught during your travels. You can switch a Pokémon during a Pokémon Battle.
- Item — This section can make you use different kinds of Items, only healing items and capturing items. You must throw a Poké Ball or any capturing ball to a Pokémon from a Pokémon Trainer.
- Run — This will make you fled immediately from battle, depends on your Pokémon level compared to the wil Pokémon which they then are blocking your way to escape. Do note that it not helps in Trainer battles.
Your Rival |
|---|
| File:RB 004 front.png |
| Charmander Level. 5 |
| Fire |
| Scratch |
| Growl |
| — |
| — |
After that your rival has been gone, you can make your way to adventure if you go to Viridian City. To get there you must walk on the same route where Professor Oak stopped you to walk, and that is Route 1.
Wild Pokémons
Pallet Town is a town that can make you connected with Cinnabar Island if your Pokémon finally learned surf, but if you got also some Rod's you can fish there and find yourself some water Pokémons.
Old Rod
| Magikarp | |
| Min Level | Max Level |
| 5 | 5 |
| Water | |
Good Rod
| Poliwag | Goldeen | ||
| Min Level | Min Level | Max Level | Max Level |
| 10 | 10 | 10 | 10 |
| Water | Water | ||
Super Rod
| Poliwag | Tentacool | ||
| Min Level | Min Level | Max Level | Max Level |
| 15 | 15 | 15 | 15 |
| Water | Water/Poison | ||
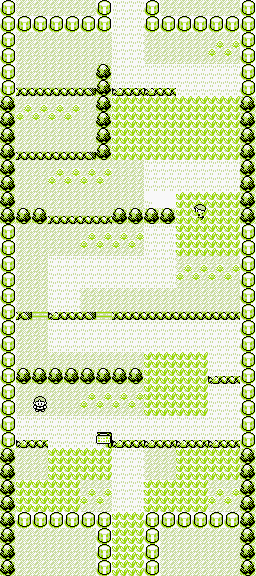
Route 1

Map of Route 1.
When you are in Route 1, talk to the first person you see on your way to Viridian City. He will tell you that he works at a Poké Mart and will give you a free Potion. Evenly that you are making your way to Viridian City, you can already train your Pokémon to make him much more stronger for future battles.
Note: If you run out of Potions, then you can go to your mom in Pallet Town which heals your Pokémon when you talk to her.
Wild Pokémons
Route 1 has a lot of grass which cannot be avoided when you're coming from Pallet Town, only if you come back from Pallet Town except for the last piece. It is also avoidable if you got any repels, which only happens later in the game.
| Pidgey | Rattata | ||
| Min Level | Min Level | Max Level | Max Level |
| 2 | 5 | 2 | 4 |
| Normal/ | Normal | ||